Showing posts with label herbalism. Show all posts

Thursday, May 3, 2012

Things I love Thursday: Dandelions


If you haven't figured it out by now, I love dandelions. I eat them and make them into things on a regular basis. Okay, on a springly basis. They're also very lovely to look at. And when they become little puff balls? ZOMG are they fun. I will spread those seeds like nobody's business.

Make a wish!
One thing we always do when dandelions come out is make wine of the petals. Mmm, by always I mean we have every year since we've lived in New Hampshire. (Dandelions don't really grow as abundantly in the lower parts of Florida).
Wine production of years past
In the four years we've been making it, and in the couple years before John moved to FL that he made it, we haven't yet found a perfect recipe. Mostly because we never remembered what we did the year before. We've tried at least 4 different recipes now. This year we decided to really buckle down and figure this out. Wine takes too long to to be so nonchalant about throwing it together. And while dandelion wine is relatively simple and since the main ingredient free, it's not an expensive wine,  it does take some work. After all, we have to pull all those tiny petals out of the bitter green calyx part. That takes time, baby!

Thems are some hot, manly hands... Oh! I mean, see what hard work that is?

Note the addition of tea cups to the process...
Especially when you consider how much of those petals you need.

This year, we made two separate batches, and I very carefully recorded all that we did for each one. One recipe called for six cups of dandelion petals, and one four cups. I'm pretty excited to taste and compare them.

But wine isn't all we make of dandelions. I've told you about pesto and fritters, which I repeated a few times again this year.

 There's also dandelion petal ice cream. The heavenly, light creamy confection that one friend of mine declared "tastes happy." It's true. This ice cream is happiness infused.


Unfortunately, I can't find where I wrote down the recipe, but I can gather from these two photos that I infused the petals into the milk and then pureed it all together. If you're adventurous, try it out. Make it up as you go or follow a vanilla bean ice cream and adapt.

 I think I may have strained it then, but I don't know. This one I haven't yet made this year because my freezer is currently too full to freeze the icecream maker bowl. If I do get a chance to make it, I'll post the recipe for sure.

You can also make a nice tea loaf out of the petals as I did one year.


I don't have the recipe I used way back then, but this one looks very similar. Try it out and be delighted by making something from your yard!

Dandelion potato soup is also a nice treat. Just follow a recipe for potato spinach soup (or even just potato soup) and put dandelions in instead of spinach. Puree and enjoy.

(If you haven't caught on to this yet, I'm using up as many past photos as I can find in relation to this topic. I meant to post most of these as their own thing, but as as per facts 4 and 5, this never happened.)

Two new things I've tried this year are dandelion tincture (extract) and dandelion vinegar.
Dandelion infused vodka, essentially

 Since I just started them a few weeks ago, and these things take a fair amount of time, I don't know how they turned out yet. But I'm excited. I may be able to add a lovely dandelion flavour to my desserts and dishes any time during the year!

So next time you think of trying to eradicate the dandelions in your yard, why not try eating them instead?

Friday, March 30, 2012

In which I eat my friend's Christmas tree

I should have posted about this a couple months ago... Actually, I should have done this a couple months ago. But it happened that a couple months ago I was in Florida and don't forget that I'm a bit of a procrastinator. It's worth the wait, however, as its awesome. Like foraging from your living room!

My own Christmas tree
Next Christmas, if you find yourself feeling rather sad about paying money to cut down a tree to be a temporary decoration in your house and then feel sad about throwing it away a month later, then here is something you might want to consider:

Pine is edible.

And it's actually pretty yummy. It tastes a lot like it smells, on the astringent side, and with a dash of bitter. It may be an acquired taste, but I find myself liking a lot of strange-ish things.

If the taste doesn't suit you, here's something else to consider:

Pine is antiseptic, antibacterial, high in vitamin C and other nutritious minerals. You can use your Christmas tree to make health elixirs, cough and cold remedies or even as an excellent cleaner if nothing else interests you. I've read from Susun Weed that pine vinegar can even clear up a lung infection. This is some good stuff, folks. Seriously!

And if one doesn't suit your fancy, try another variety. The taste can really vary, so don't give up if you try one that isn't so yummy.

This year my friend* had a beautiful Christmas tree of a variety I had never seen before. It's needles were long and wide. They reminded me of rosemary. I asked her if I could taste it. Heh heh. Thankfully, my friend is used to me and my weird ways and told me to have a go if I really wanted.

Well I did, and it was actually quite pleasing to the palette. Up until now, the best tasting pine I've been able to find is White Pine. Her pine tree (and I might have this wrong but I think she said it was called a Scotch Balsam) was lemony, slightly minty, spicy and (of course) piney. It delighted me. I asked her if I could have it when she was done using it as her temporary decoration.

She happily obliged me, saying "I'm glad my super expensive Christmas tree is getting more uses than one!" And then I had a large bag of pine branches hanging about my  house for about a month before I finally got around to turning them into things.

Pine vinegar, pine simple syrup and a jar of pine needles
So far, what I've made is: Pine simple syrup, for flavoring beverages and maybe even making candy.. (I think it might be fun to make pine lemonade, though John thinks it'll taste like cleaner....) Pine vinegar, which I intend to use in cooking as one would use balsamic vinegar. And pine soda.

Yup! Pine flavoured soda. It's kinda wild tasting. I carbonated it using a fermented wild yeast starter that I learned to make here at Learning Herbs. Instead of flavoring my soda with blueberries, as in the linked recipe, I made a sugary pine decoction and turned that into soda. Good stuff!

I also stripped most of the left over branches of their needles and intend to use them as an herb in cooking, the way one uses rosemary. But I could also put it in tea and blend it with other flavors. I'm thinking of chopping up the remaining needle-less branches and slow steeping them in olive oil for some piney oil. Which has many uses in and of itself! Salves, salads, wood polish...

I love that I can eat my cleaners and skin care. No toxins here!

For the simple syrup, I combined 2 cups sugar and 1 cup water in a pot. I added a bunch up pine needles and some of the smaller branches and stirred and let simmer under a lid for about 15 minutes. I probably could have let it go longer. The more pine you use, the more piney it will taste, (obviously). I thought mine was a little too sweet and not as piney as I hoped. I was following the Simple Syrup recipe in Joy of Cooking, but next time I think I'll use less sugar and more pine.

For the vinegar, take a glass jar and pack it with pine needles and branches then fill the jar with apple cider vinegar. Put the lid on (if it's a metal lid, place something like wax paper or several layers of plastic between the jar and lid because vinegar really corrodes metal) label it with the date and wait 4-6 weeks. Then you can strain it (or not) and use as you please, on food, or your toilet! You might want to make two jars, one for each, you know, so nothing cross-contaminates, eh...

So next time you have a Christmas tree, or someone you know does, try it out. Not all of them taste as good as others, but they're all edible and useful in so many ways. I was particularly delighted to find a tree that tasted so dern yummy, but there's loads to do with even the not-so-yummy varieties. You can even just go out to your closest woods and bring home some pine today if you can't wait till Christmas. Go ahead and try it!

I wonder if pine ice cream would be any good...

* I didn't actually get to use my own Christmas tree this year for a couple reasons - it was not nearly as tasty as my friend's and I didn't want a pine overload in my house, and we actually forgot to water it most of the time we had it, so by the time we got to taking it down there wasn't much left to it.  Don't let this happen to you!

Monday, January 9, 2012

Happy 2012! and some cool but unposted projects from 2011

HAPPY NEW YEAR!!! 9 days in but that's definitely still new!

Well, I've been away for a couple months but that's no surprise, right?

I guess Nanowrimo really used up my writing juices for awhile. But I'm getting back into it, updating my journal, finally responding to my letters and last but...probably not...well, maybe it is, least...this blog! It occurred to me that I did a lotta stuff last year that I totally intended to do a full on post about and never quite did. My apologies, you're missing out and it's all my fault.

Let me know if you would like a more detailed post of any of the following, and I'll be happy to oblige.

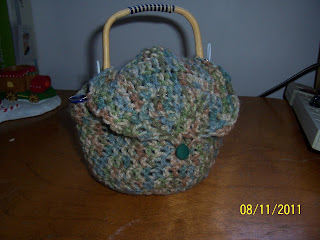
I made a nifty thrifty little purse using half a cloth place mat and a long length of ribbon. Easy-peasy.

Love the colours. And the adorable clasp.


Foodwise, I made my first (and second) turkey in 2011. It was delish and now I feel all empowered with this new ability. I'd recommend always brining one's turkeys. Unless you're going to deep fry it, now that I'd like to try next. Noms.

Not the greatest photo, but the only one I have.
 I also made second place winning apple cinnamon rolls! Complete with whole wheat flour and deliciousness!
 And a first prize winning Pumpkin Pear trifle, my own recipe. This photograph is terrible but it's better than the other terrible photo I took. We were in a hurry to get to the baking contest at the church and a rushed photo is generally never all that great.
Crochet wise, I made a scarf and two cutie beret-style hats, which I unfortunately haven't taken pictures of. The scarf I already gave away as a Christmas present, foolish me. But I also made this awesome tea cozy, isn't it great!? I didn't have a pattern but it was pretty simple and it really works to keep my tea hot for longer!


Herbalism adventures included making tons of extracts for using in cooking and a couple medicinal ones, the ones I can remember off the top of my head include Earl Grey tea, jasmine green tea, peppermint, rose, lavender, ginger, vanilla (duh, haha), yarrow and st. Johns wort.

And herb vinegars too! A fire vinegar with ginger, garlic, thyme and cayenne pepper will knock the socks off of any cold or flu, and I made a pine vinegar which is tasty on salads and I'm considering doubling it's use as a cleaner...Blackberry and tarragon vinegars made it into my stock as well, this year. And herb infused olive oils have been very handy for making salves, salad dressings and deodorants!

oils

fresh poured salves

Making fire vinegar
The round up
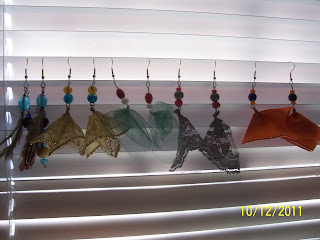
 I've been trying my hand at making earrings too. Here's a couple photos of some of them. I made these with the intention to sell them, but only ended up selling one pair. I'm considering an etsy account, but maybe not just yet. What do you think of this style?
Blue and Gold

The pair I sold

Wedding earrings, get it? white lace, pearl and blue.
Well there's a lot more but time and space should be limiting me now.

Here's to a happy new year filled with even more awesome projects and good food. Got any big plans this year?

Wednesday, May 18, 2011

What ELSE can you do with a dandelion? Dandelion Fritters.


Yep! Dandelion fritters. I can't take credit for this idea or the recipe. I saw it first and followed the recipe from the Learning Herbs website. They have all kinds of cool information on herbalism and natural medicine, and I enjoy browsing the site every now and then. I followed the recipe they have there with slight tweaks of adding a bit of salt to the batter, and using a half all purpose and half whole wheat combo for the flour. (They don't specify any kind of flour, so I'm thinking it's cooks choice in this matter.) I didn't count, but I made quite a few fritters and still had a bit of batter left after I used up all my dandelions. This little bit of batter went a pretty long way; I'm guessing I made somewhere around 30.
Here's the recipe:
Dandelion Fritters
1 egg
1 cup milk
1/2 cup whole wheat flour
1/2 cup all purpose flour
1/2 teaspoon salt
a basket full of freshly picked wide open dandelion blossoms
cooking oil

In a medium skillet heat an inch or so of oil. Mix up the batter well and dip dandelions petal-down, holding the green part, swirl it a bit to get it covered in batter and place in heated oil. Once in starts browning, flip it over and let the underside get cooked. Transfer to paper-towels to drain. You can cook several at once, just make sure you keep an eye on the ones that went in first to prevent burning.

I served a few dandelion fritters along side my dandelion leaf pesto (I thought they were kind of cute, like meatball-replacers) but the rest of them we ate with a honey-mustard dipping sauce, which I think suited them better. They were really quite tasty: tender with a slight sweetness that was set off by the bitter stem/sepal part. John and I ate all the ones I made and were quite satisfied at the end. I had been a little worried that the meal wasn't going to be substantial enough but we both came away pretty full.

This would make a great afternoon snack, and didn't require any more effort than your average fried style recipe, excepting the the gathering part...Which was actually very fun. I bet kids would get a kick out of this!

Thursday, March 31, 2011

How to make Herb Infused Oils


Herb infused oils are wonderful to have on hand for both medicinal and culinary uses. I've been thinking I ought to try making them for a year or so. Which is why when I saw a little article on how to do in in an herb catalog, I immediately decided to give it a go. Since I had the time, some useful herbs on hand to try it with and copious amounts of olive oil as well. (I tend to get a lot more done when I have the "seize the moment" and "Why not now" attitude)

As a result, two days and very little effort later I had myself some pleasantly aromatic St. Johns Wort oil which I fully intend to use on burns(including sunburns), scrapes and bruises as a pain-reliever and healing rub. (And when I get some beeswax, eventually, I'll make some salve with it too.)

Amazed at how easy it was, I thought I'd give a little tutorial on the subject.

You'll need: a crockpot*, a washcloth, water, a mason jar, herb(s) of your choice and food grade oil, (I used olive oil.)**

This time around, I decided to use a blend of Rosemary and Sage for a cooking oil. (These herbs are also really antiseptic and effective at fending off viruses.) I used approximately half the amount of each. I didn't measure, though.

I recommend using a mason jar with the proper seal and lid, but any old jar will probably do. Just make sure it has a well fitting and leak-proof lid.


Once you've got your herb in your jar, pour in your oil. (sorry about the blurriness of a couple of these photos)

For the culinary oils I used an herb to oil ratio of about 1 to 3. For the St. John's wort, I used 1:2 because I wanted it to be pretty potent. They both turned out excellent so use your own judgment or experiment to see what works best for you.

Screw the lid on tightly. Place the washcloth on the bottom of your crockpot, set your jar of herby oil on top of that and pour water all around it until it's almost to the top. You don't want your jar submerged, or even water to get too close to the lid because water and oil don't mix and a little water could ruin the batch.


Turn your crockpot onto low setting and then continue your life as usual. Just be sure to check back every few hours to refill the water, as it will evaporate fairly quickly. (I refilled mine 2 or 3 times a day.)

Approximately two days later turn off your crockpot and let it cool, remove your oil and open it up to smell the fragrant infused oil.

Strain and or funnel into the storage jars of your choice. (You can even strain it into a bowl or cup and then pour it back into the original jar after you've discarded the herb remnants.)
(As for discarding the herb remnants, I couldn't bring myself to, though I have no ideas of what to do with them. Ideas anyone?)


Label it up. And....
Tada! Your very own custom infused oils. I'm thinking these will be amazing gifts.

I use brown paper bags and permanent markers for my labels. I like to think that it gives them a rustic, natural and old apothecary style. I also like how it gives me a chance to use all the tiny brown paper bags that I get a ton of and don't have the heart to throw away.

*If you don't have a crockpot, or would rather not use your giant family sized crockpot for such a little thing, you can buy a small one for a fairly decent price. I bought the 1.5 quart one in the picture for about 8.50 on sale at Target. It's adorable and perfect for this very thing.

**I didn't use extra virgin olive oil, though you can use it if you'd like. I can't guarantee, however, that it will retain it's healthy extra fatty goodness or whatever it is, since you do heat the oil. Then again, it may not affect it at all.
Related Posts Plugin for WordPress, Blogger...